Thursday, December 27, 2012

Luminarias

It is so hard to have to wait weeks and weeks to see the professional photographs of a wedding when you want to blog about each and every detail . . . hard as it is, I understand the need to be patient.

In the mean time I've been blogging about some small stuff. I don't know if the pro got a close-up of the luminarias we placed around the pool - if he did, I will add it later in the overall wedding album post.
This photo shows the reflection from the lights in bushes - so pretty

These luminarias were inspired by the ones I saw online (Martha Stewart Weddings) using gold doilies. In these photos you cannot tell we even used doilies, but the lacy pattern showed through the bag and added a pretty touch to an ordinary paper bag luminaria. I just happened to have a few packages of vintage gold doilies and I was so happy that I did because you normally only see white ones in the stores (might be able to order gold online.) We used white bags in two sizes and white votives.

Luminarias in misty weather do not always work because the bags can collapse in the dew. I thought it would be worth the try anyway, and decided not use sand in the bottom of the bag to place the votive on. Sand holds moisture that could aid in the bags getting wet. We went with a glass votive holder instead and it worked - not one bag collapsed in the cool night air.

They looked so beautiful around the pool and they are not difficult to make yourself. 
A fun photo - not sure if this was from trying flash or not
New photo by John Robert Woods Photography
John Robert Woods Photography

Monday, December 24, 2012

The Italian "Feast of the Seven Fishes"

In many Italian-American households having fish on Christmas Eve is a tradition that was brought here by family members that immigrated from Southern Italy.

We lost our beloved Maria Schmitt this year. She was my first-cousin - the daughter of Frank and Mollie Cinelli. Mollie was the first-born of the ten Rossi children born to Victor and Grace. Maria helped me so much when putting together Rossipes, and she told me the story of the Feast of the Seven Fishes the way they did it in our family:

"In those days we couldn't eat meat on Christmas Eve. We would go to Los Angeles and buy baccala which is a very hard dry fish. Hard as a rock and we would buy large slabs of it . . . then it had to be soaked for several days to make it soft enough to cook. It was probably sent in from Italy that way - well preserved! Then my Mom would make it into several different recipes. It was a tradition. It was fun in those days."

Last April I was co-hosting a baby shower for Maria's granddaughter, along with Maria and Maria's daughter Joanne. After one long day of working on the food for the shower, Maria suggested making Linguine with White Clam Sauce, which was one of her specialties. I had never had it - never thought I would like it - but I was willing to try it that night. It was delicious and so easy to prepare.
Me, Maria, and Joanne getting ready for the baby shower
In honor of Maria and keeping those Italian traditions going, here's a easy dish with fish you can make for Christmas Eve:

Linguine with White Clam Sauce

1/4 cup olive oil
2 clove garlic
1 (8 ounce) bottle clam juice
1 (6.5 ounce) chopped clams
fresh parsley, chopped
salt and pepper
a little white wine
3/4 pound linguine, cooked
grated Parmesan

Heat olive oil in skillet and add garlic - brown garlic (don't let it burn)
Add the bottle of clam juice and the juice from the can of chopped clams (reserve clams)
Add some chopped fresh parsley and a touch of salt and pepper
Add a little white wine and simmer for about 15 minutes
Add the clams and serve hot over linguine
Top with Parmesan cheese and a touch more parsley.

Merry Christmas and Happy New Year!

Wednesday, December 19, 2012

Aglio Olio

Aglio OlioFor some reason, in our family, this dish has created fear among those who have never made it.  In years past , a few of the Rossi sisters would make big batches for Christmas Eve dinner. However, it is not a difficult pasta dish to prepare . . . so Rossi Family, it's time to "go for it" - now who is making it this year?

Rossipes is the book I put together of family recipes
Each of the sisters had her own version of  the dish and each spelled it a bit different too.

Ailya-Oilya was from my aunt Yvonne Rossi's recipe. 

Agli D’ Olio  was how my aunt Gloria Pistacchio wrote it. 

Agli Olio  was the way my aunt Mollie Cinnelli spelled it.

How ever we spelled it, we pronounce it: “ah-ya-ooh-ya”


Here is one version of our family classic pasta dish:

4 cloves garlic – minced
1/2 cup olive oil
6 cups hot water
1/2 teaspoon each salt and pepper
6 ounces chopped green olives with liquid
1 or 2 cans anchovies
6 or 8 capers (optional)
1 pound vermicelli

Heat garlic in olive oil, but do not brown. Add hot water and salt and pepper. Add green olives and bring to boil. Reduce heat and simmer for 45 minutes. Add anchovies and the oil in the cans and break up with the back of a wooden spoon. Add capers, if desired. Simmer for another 15 minutes. Cook vermicelli according to pkg directions. Stir sauce with a large scooper spoon while putting over vermicelli. Tastes better when allowed to set for a while. Sauce will keep for a month in refrigerator.


The handwritten recipes are in Rossipes and make the book extra special 

garlic ready to go for the sauce

other ingredients for the dish

my version was made without capers
The Rossi girls from left to right: Aunt Gloria, Aunt Eve,
Grandmother Grace, Aunt Connie, Aunt Mollie, and my Mom, Eleanor

My granddaughter, Olive Grace, likes olives and loves pasta, and calls herself "Ahya"
I might have to make her a batch of Aglio Olio, but without the hot peppers!


Tuesday, December 18, 2012

The Meeting Tree

Mike and Lindsey's wedding had many unique qualities. Something different and unexpected - that's the part of wedding planning and designing that I love. The first thing I do is create a vision - it's almost like writing a script for a play. Then we bring it to life.

This wedding was in a beautiful backyard in Orange County, California. Both the ceremony and reception took place in the yard. We timed the ceremony to begin at dusk, and the lights became magical as the ceremony ended. More on that soon . . . 

One aspect of the ceremony that was different was the path the bride walked down to reach the ceremony site. It was not a typical isle. It was the path that led from the gates and went around the yard.
The long and winding path
The bride thought she'd like to walk alone to meet-up with her groom . . .  but it was a long walk from the gate to the lamppost where the ceremony would take place.

About half way down the path was a big tree and the idea of a "meeting tree" was born. We would do something special to signify that the tree was important and that is where the groom would walk to meet  his bride - for their continued journey to the lamppost together. I thought of this engraved wood heart. It was meant to give the feeling of having their initials carved in the tree as young sweethearts would do.

This heart was made by my friend's company just for us. 
The bride decided she really wanted to walk on the arm of her step-father, at least to the tree, and since we liked our meeting tree idea so much, we stayed with the plan for the bride and groom to walk together the rest of the way. 
Mike and Lindsey meet at the tree. Photo by John Woods Photography
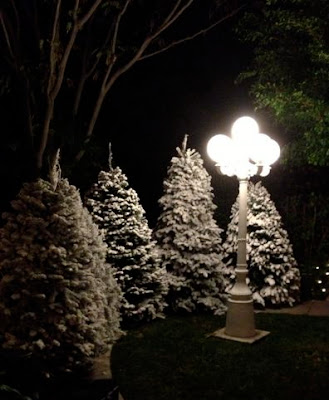
Here is another view of the lamppost from the other side of the yard. And the following photos show how the area was transformed into a winter wonderland for the wedding.


The bride hand-selected each of the five trees and had them custom flocked for the site.


The trees created the perfect backdrop for the entire evening.


The site at night. Photo by John Woods Photography.


You can watch the entrance video here of the wedding party and bride and groom.


Thursday, December 13, 2012

Filling Glass Ornaments

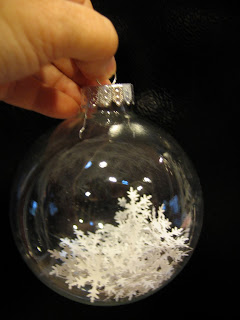
There is no shortage of what you can do with clear glass ornaments but this project is fun, simple, and inexpensive. You can even find the empty glass ornaments in thrift stores – or you can purchase new ones in craft stores.


I was going to use these filled balls on a table for my granddaughter's birthday party, but after finding a pink Christmas tree, I hung them on it instead.

You need cardstock paper in your choice of colors and die-cut punches to make the shapes. Use several colors in your color scheme, or try different shades in one color group for a monochromatic look.


After trying lots of shapes I found that ones shaped like a flower, a hand, or a snowflake worked the best. The heart and star did not work as good because they are rather “flat” and do not have petals or fingers that give the shapes dimension.


 Simply cut out a lot of shapes and fill the balls - bending the cutout slightly to give it some depth when inside the ball.


Take off the top of the ball. Be careful if the glass balls have a rough cut mouth so you do not cut yourself as you push the cutouts through the hole. I had to use a tweezers to fill some of the balls.

Pushing the cut-outs through the opening - use tweezers if the mouth is sharp


So simple and so fun!

Monday, December 10, 2012

Front Door Wreath

It has already been a year since my granddaughter Olive had her 1st birthday party. I just noticed that I never shared this blog post about the wreath I made, and here we are again in December.

I wanted a wreath for the front door so I decided to make one with the colors of the party. They became my colors for Christmas last year. And since I loved this wreath so much it is back on the front door again this year.

The wreath starts with a styrofoam circle and three packages of different sizes of styrofoam balls. I began by wrapping the wreath with wide strips of left over fabrics from the outfit I made for the birthday girl. Using long pins with a white bead head. It was faster, cleaner, and easier than using glue. I added a long ribbon for hanging and to gave me some perspective of where the top would be.


I wrapped balls with yarn (again no glue) starting by tying the yarn around a long pin to secure and wrapping until I could no longer see the white stryo. I added another pin and that became my center for placement. I liked the look of the pin, so each yarn and fabric ball has one showing. We had several skeins of the right colored yarn left over from my daughter’s wedding and just added a cream with a gold thread for some sparkle.


For the glass ornaments I added a length of ribbon through each hanger and that became a fun part of the wreath. Be sure the ribbon goes underneath the balls and towards the back of the wreath for now. Jumping ahead (just so you know) I tied some ribbon in bows and left others just flowing. This was the last step to complete the wreath as I decided which ribbon to tie as it was hanging on my door.


Using three more balls, I wrapped them in some of the left over fabric that I cut into strips. I used pins to secure. We found some glittery pink bells in two sizes - they were great to add here and there. 

To assemble, I began with the three large yarn balls and then added smaller yarn balls, glass balls, fabric balls, and bells. I got out the hot glue gun for this step because I wanted it to go fast and be secure. Placement is all about using your eye to determine where the colors should be and where there is a “hole” that needs to be filled. Have fun with it.

Rosemary: Symbol of Love and Remembrance

This weekend the wedding I have been designing for several months took place on a cool night in Southern California. There are not too many places where you can have a wedding - at night - in December - outdoors. We lucked out and even though it was chilly, we were not freezing. I will be bringing you all the details in stages, but today I am starting with our use of rosemary.

A small potted rosemary tree was placed on a table near the entrance to the wedding. It was in the shape of a Christmas tree and sat next to a hand-lettered (by the bride) and framed sign. Brides have forever been using rosemary as a symbol of love and it is a perfect symbol for remembering loved ones as well.

We use a round table to hold the rosemary tree, the sign, hot cider (naughty and nice) and a basket of rosemary cashews for guests to nibble on as they arrived.

Pouring a cup of hot spiced cider

Naughty or Nice tags for hot cider

I saw tags in the Ballard catalog for naughty and nice beverages and decided to make a version for our hot cider urns. The naughty cider had apple jack brandy added. It was the most popular of the two!

One of my favorite herbs for cooking is rosemary. I have a large bush in my yard and that means I always have rosemary on hand when a recipe calls for it, or if I just feel like adding it to roasted potatoes or carrots.

The first time I made Roasted Rosemary Cashews was on Thanksgiving a few years ago. They were so popular I made them again for my daughter's wedding. And, I did it again for another wedding over the weekend.
Little bags of nuts to nibble on before the wedding

The recipe from is from Ina Garten. They are so good and everyone loves these any time I make them.

I revised the recipe to make a big batch. I actually made them in two batches, cutting this in half for each batch, so I could stir them in a large bowl (a really big bowl.) If you do not have a really, really big bowl, you may want to make them in 4 batches. The nuts took two large baking pans to roast per batch.

Here is the recipe that I revised to make 100 or more little servings (depends on what you use to serve):

ROSEMARY    ROASTED  CASHEWS

10 pounds whole cashew nuts
14 tablespoons fresh rosemary leaves
3 teaspoons cayenne
14 teaspoons dark brown sugar
14 teaspoons kosher salt
7 tablespoons melted butter

Preheat the oven to 375 degrees F.

Place the nuts on an ungreased baking sheet and bake for about 10 minutes until they are warmed through. Meanwhile, combine the rosemary, pepper, sugar, salt and butter in a large bowl. Toss the warm nuts with the rosemary mixture until the nuts are completely coated. Bag in a zipper bag to store when cool. Serve at room temperature. 

Makes enough for 100+ little bags/cones of nuts.


Another version of our nut holder for my daughter's wedding

We made these cone holders using card stock. First I printed love songs on the full size sheets. You only need the first page of the love song. I found them on a free sheet music site online. Then, we cut the paper into a fan shape and folded it to form a cone (takes a few tries to get the shape you like) and secure with good double-stick tape. Since the nuts were just for a snack, my goal was to create a cone that would hold a nice little serving . . . not a huge amount.

Rosemary - so easy to grow, so yummy, so fragrant, so plant some in your yard soon!!