Thursday, July 26, 2012

Sew-Eco-Chic-Toddler

My favorite materials for sewing are someone else's cast-offs. I love to scout the thrift stores for great fabrics from blouses, skirts, curtains, etc. to use for making something new.
Lulu wearing the "summer look" with bloomers and a sleeveless t.

Here are a few pics of my granddaughter Lulu wearing a skirt I made for her from a thrifted blouse. I did purchase the rick-rack and elastic for the waist. The lace at the bottom of the skirt is part of a large collection of vintage lace I have been collecting for years.
Detail of the lace and large rick-rack trim.

The "winter look" includes leggings and a sweater.

Lulu is going to Italy with her parents for nine months and I am trying to make some cute clothes for her to take. They are leaving in about a month, so I better get busy.

Sunday, July 15, 2012

LĂșthien Luna's 1st Birthday Party - Part Two

As I looked through my past blog posts, I realized I had not yet completed a post for my granddaughter LĂșthien Luna's 1st birthday party held in late January. Her party was just 7 weeks after my granddaughter Olive's 1st birthday and we wanted a completely different party theme and color scheme.

When I saw this balloon in October, I loved it and it became my inspiration for the party. I purchased the balloon months ahead of time and took it back for filling the day before the party. It was a "hippie chic" theme with birds, butterflies, owls, and peace signs. We selected the turquoise, green, and brown for our main colors from the balloon.

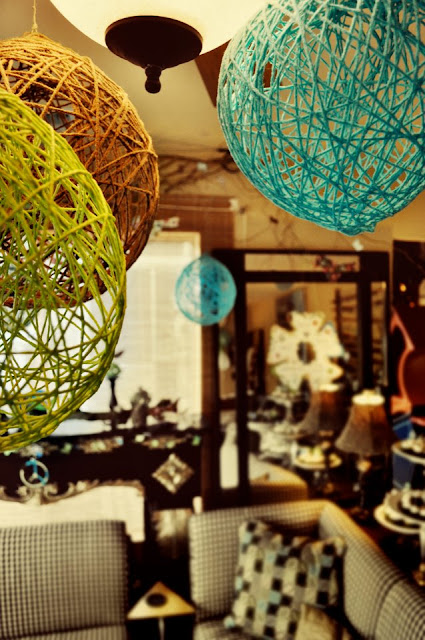
I made lots of yarn balls in various sizes to hang in the house from my ceiling fans and the twig garland. They are made with yarn, glue, corn startch and balloons were fun to make . . . but messy and time consuming. And, you needed a lot of patience!! The front door decoration included several small yarn balls, ribbon, and birds.
I made a gathered garland from crepe paper cut into different widths and sewn together.
To gather the garland I sewed down the middle with a basting stitch and bunched it up as I went along. It would've been too difficult (and time consuming) to try and gather the traditional way by pulling the threads after basting. Perfection was not an issue because once it is hanging it gives an overall great look and you do not notice any thing that might not be perfect.  Take it from me, a somewhat perfectionist!!
The owls made from empty paper towel rolls cut to different sizes. 


Fun idea I found somewhere online looking for owl crafts. Sometimes I find an idea to begin with and take it from there to make it my own. In this case I added all the layers for wings. If I was doing it again I would cut large paper circles to paste on before adding the eyes.
Paper bird idea was also found on a children's crafting site - paper clip legs were a bit tricky, but it is a fun project. A different bird design (below) with hole-punched eyes and glued onto moss (they have paperclip legs too but they are stuck into the moss.)

I made a hanging peace sign with some of the yarn I used for the orbs. It's a small embroidery hoop with cut coffee stirs glued on and then rapped in yarn.
The lunch theme was "finger food" and everything could be eaten out-of-hand or with a food pick. I made lots of food including little peanut butter on celery with chopped p-nuts on top, a veggie/dip tray, chips and our homemade Fallbrook Guacamole, roasted red peppers with baguette slices, stuffed salad shells, and several tea sandwiches . . . 

                                                          Smoked salmon tea sandwiches and Egg Salad Rounds 


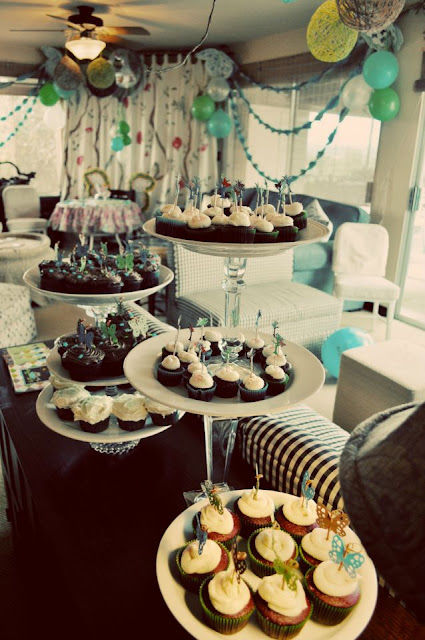
It's easy to make your own "flags" for cupcakes using toothpicks and cut shapes - these were bamboo picks  - a bit more fancy than regular toothpicks.

The Cupcake Bar


The birthday girl helping Granmakin!!!


Even the bathroom was in theme with these little owl vintage Avon jars I found at the Great Park Antique Market.
You can see and read more here including Lulu eating her cake and some other pics of Lulu and Olive's 1st Birthday's. Oh and you can see both babies in their birthday outfits I made for them.


Sunday, July 1, 2012

DIY Ribbon


During the last year that I had my retail shop in downtown Fallbrook, I started making ribbon under our Sew Eco Chic line of clothing and accessories. I found that ladies pants offered the best patterns and fabrics for making ribbon . . . (and I often wondered why any gal would select such a print for a pair of capris?)  I am talking about rather LOUD prints - and it was easy to find the thrift store racks over-loaded with these cast-offs.


saved old ribbon spools to use for newly made ribbon
I saved the ribbon spools from shop ribbon we had finished using and they were perfect for wrapping my newly made ribbon on.
some of my home-made ribbon collection
Simply cut strips of fabric from the capris or pants - I used a rotary cutter and was not too particular about being perfectly straight with my cuts. Using a serger, I just sewed up and down both sides of the strips of fabric (after first sewing the strips together to form very long strands of ribbon.)

I have not tried this yet - but I have some wire from the jewelry section of the craft store ready to lay down as I serge the edges. Voila, wired ribbon.

sew the strips together before serging the edges

some of my stash of capris for making more ribbon